# Dayforce Training - Supervisors / Managers
Supervisor/Manager Access Level
# Logging In as Manager
- How to Access Dayforce on the Laptop / Desktop
1. Go to the Dayforce Website at **[MyDayForce Login](https://www.dayforcehcm.com/mydayforce/login.aspx "Dayforce Website")**
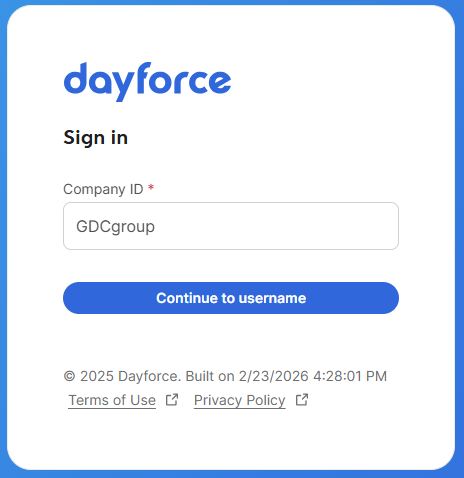
2. Sign in by putting the Company ID: GDCGroup and then click "**continue to username**."
[](https://docs.goodwindcorp.com/uploads/images/gallery/2026-04/Prcimage.png)
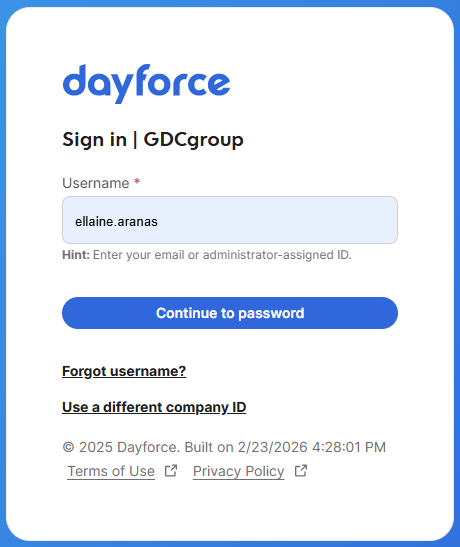
3\. Type the username: username Format: firstname.lastname and then click "continue to password."
[](https://docs.goodwindcorp.com/uploads/images/gallery/2026-04/0LXimage.png)
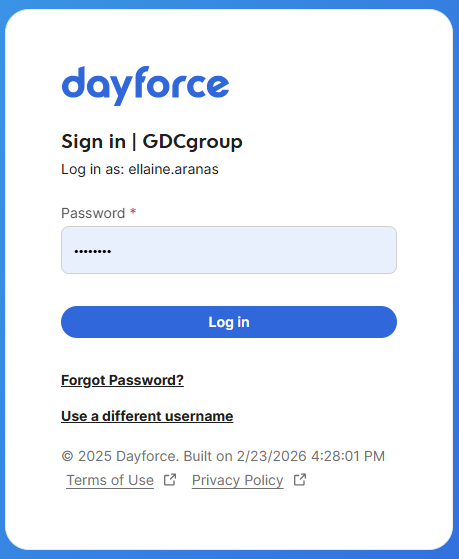
4\. Type the password set to the account and then click "Log in."
[](https://docs.goodwindcorp.com/uploads/images/gallery/2026-04/91Oimage.png)
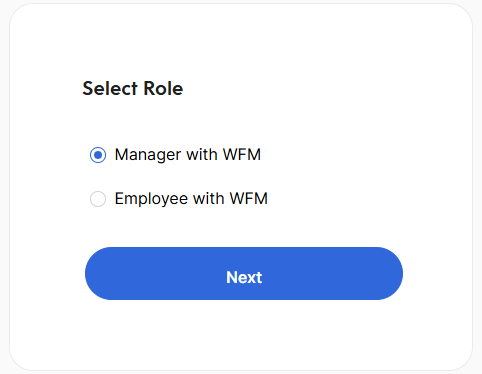
5\. Select the Role " Manager with WFM" and then click "Next."
[](https://docs.goodwindcorp.com/uploads/images/gallery/2026-04/vsCimage.png)
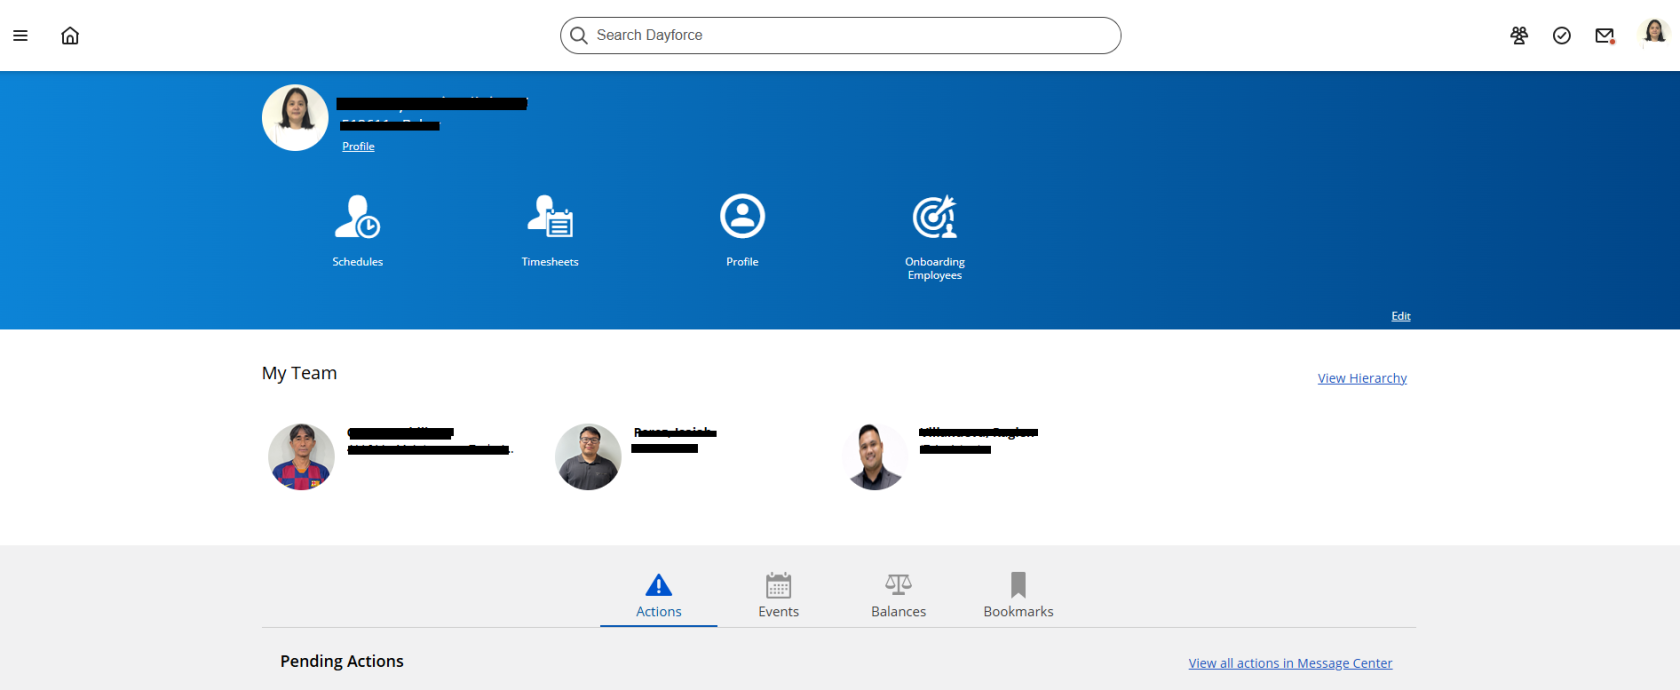
6\. Home page will appear on the screen.
[](https://docs.goodwindcorp.com/uploads/images/gallery/2026-04/5Rqimage.png)
# Schedule Creation for the Staff
#### **Option 1: Specific Date**
---
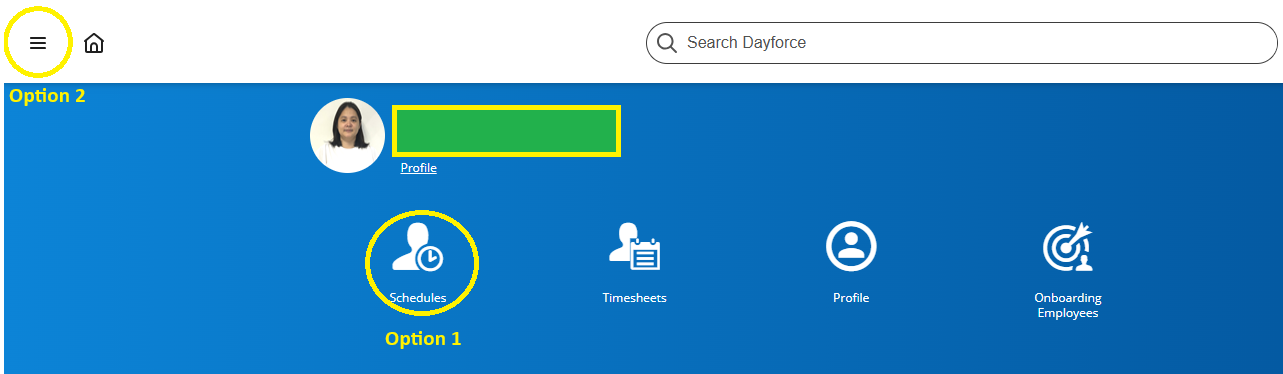
1. Option 1: Click the icon "schedule."
2. Option 2: Click the navigation or list icon.
[](https://docs.goodwindcorp.com/uploads/images/gallery/2026-04/YlHimage.png)
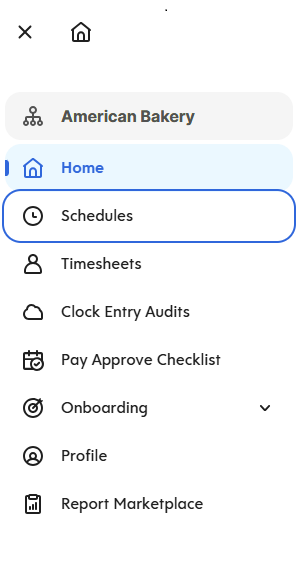
- - - For Option 2: after clicking the navigation icon, click "Schedules."
[](https://docs.goodwindcorp.com/uploads/images/gallery/2026-04/65Aimage.png)
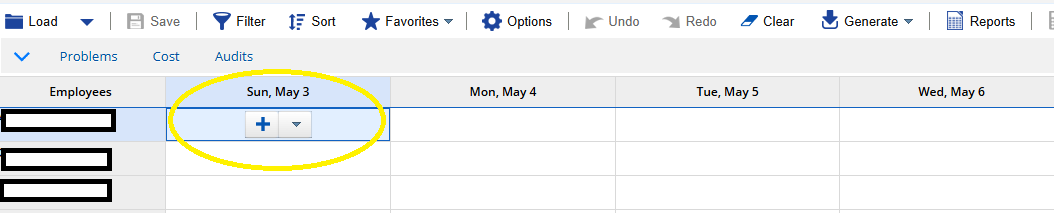
3\. Navigate to the specific date and then click the plus sign (+) icon to add a schedule.
[](https://docs.goodwindcorp.com/uploads/images/gallery/2026-04/Qp4image.png)
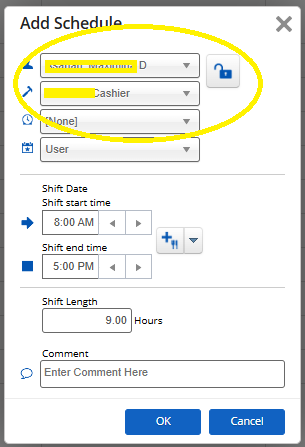
4\. Employee Name, position, employee number will automatically appear on the screen.
[](https://docs.goodwindcorp.com/uploads/images/gallery/2026-04/2n3image.png)
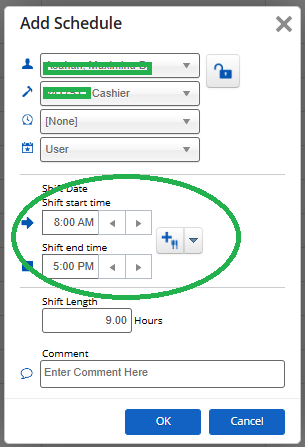
5\. Input shift start time and end time.
[](https://docs.goodwindcorp.com/uploads/images/gallery/2026-04/A2dimage.png)
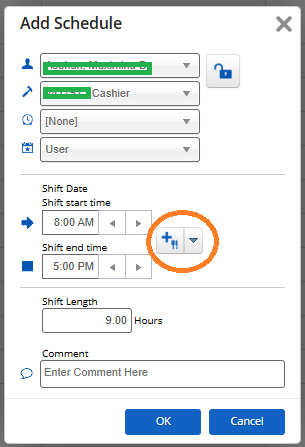
6\. Click the "plus sign with the fork and knife" icon to add break time.
[](https://docs.goodwindcorp.com/uploads/images/gallery/2026-04/V6jimage.png)
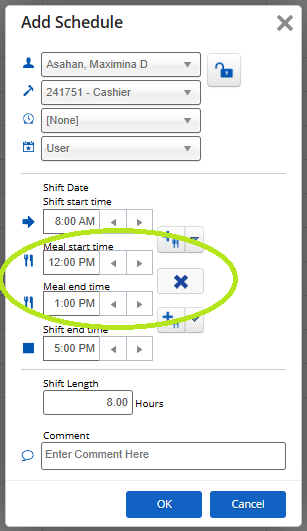
7\. Input meal start time and meal end time and then click "ok." Shift length will automatically calculate once time has been inputted.
[](https://docs.goodwindcorp.com/uploads/images/gallery/2026-04/XBnimage.png)
#### **Option 2: Generate Weekly Schedule From Previous Week**
1. Go to "Schedules."
2. Click the "Generate" dropdown list and choose "Copy Week". [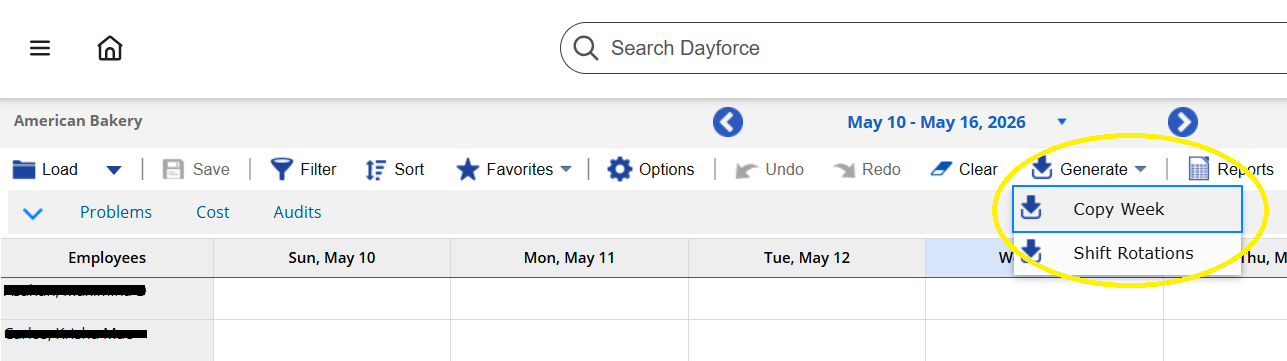](https://docs.goodwindcorp.com/uploads/images/gallery/2026-04/eR3image.png)
3. Click the "calendar" button to choose the week that will be copied for the next schedule and then click "Copy." [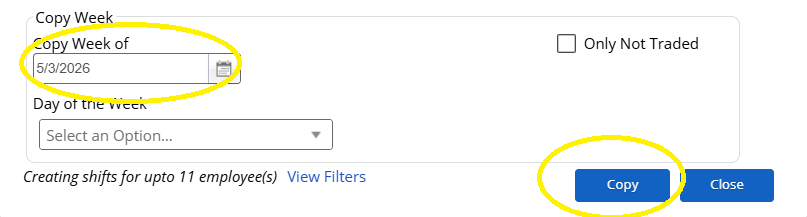](https://docs.goodwindcorp.com/uploads/images/gallery/2026-04/oH3image.png)
4. Schedule for the entire week will show on the screen. [](https://docs.goodwindcorp.com/uploads/images/gallery/2026-04/E4Aimage.png)
# Authorizing Timesheet Records
#### **Auhtorizing of Late in / Late out**
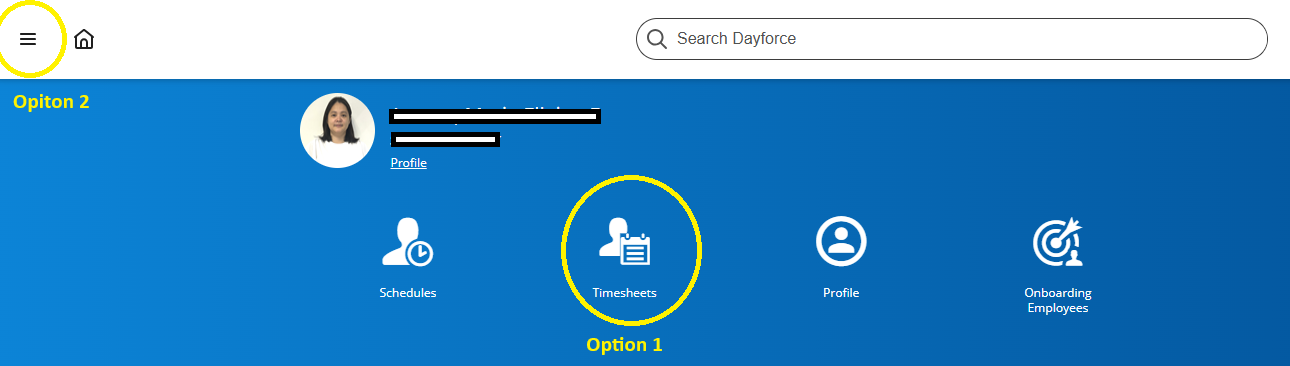
1. Option 1: Click the timesheet icon.
Option 2: Click the navigation / list icon.
[](https://docs.goodwindcorp.com/uploads/images/gallery/2026-04/GNkimage.png)
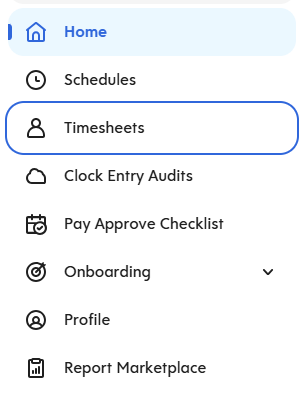
For option 2: after clicking the navigation / list icon, choose "timesheets" in the dropdown list.
[](https://docs.goodwindcorp.com/uploads/images/gallery/2026-04/gWNimage.png)
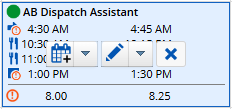
2\. Go to the specific date in the employee's name to approve late in / late out then click the "pencil" icon.
[](https://docs.goodwindcorp.com/uploads/images/gallery/2026-04/j0ximage.png)
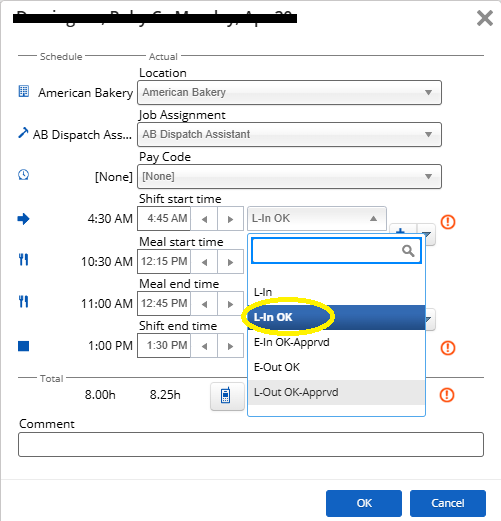
3\. To authorize late in, click the L-In dropdown list, choose "L-In OK."
[](https://docs.goodwindcorp.com/uploads/images/gallery/2026-04/Qvtimage.png)
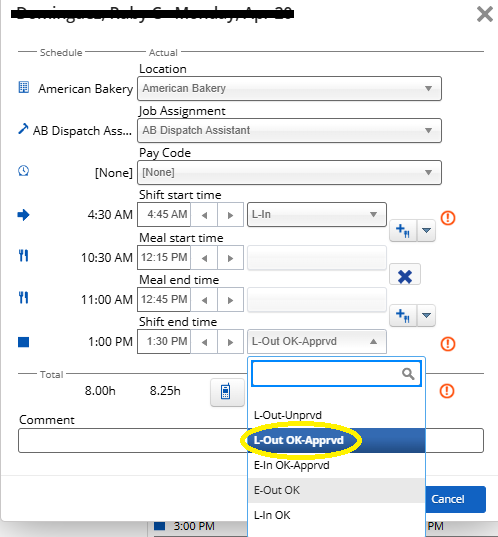
4\. To authorize Late out, click the L-out Dropdown list and choose "L-Out OK-Apprvd."
[](https://docs.goodwindcorp.com/uploads/images/gallery/2026-04/on6image.png)
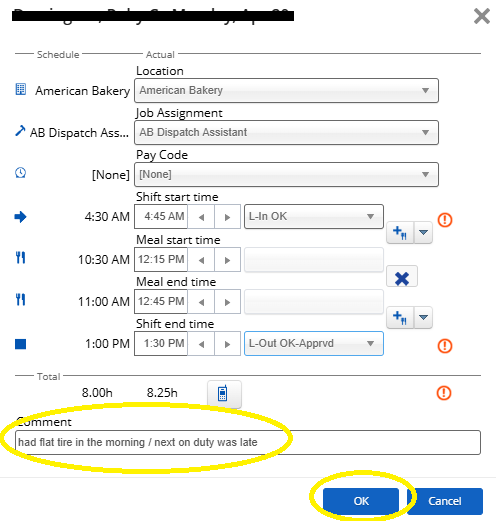
5\. Input justification in approving late in / late out and then click "OK."
[](https://docs.goodwindcorp.com/uploads/images/gallery/2026-04/JbIimage.png)
#### **Authorizing Employee's shift**
- **For One Single Shift**
1. Go to the specific employee and click date to authorize a shift. Specific box date will turn to blue. [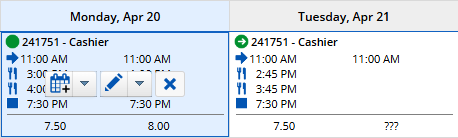](https://docs.goodwindcorp.com/uploads/images/gallery/2026-04/lKJimage.png)
2. Click the icon "Authorize." [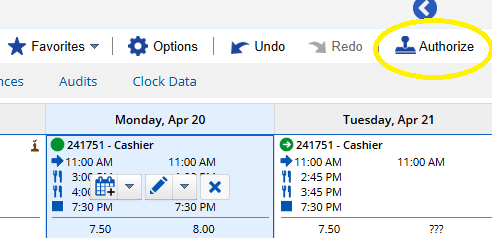](https://docs.goodwindcorp.com/uploads/images/gallery/2026-04/L5Dimage.png)
3. A brown person with a check mark on top will appear once shift has been authorized. [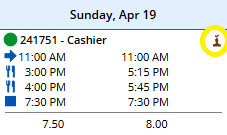](https://docs.goodwindcorp.com/uploads/images/gallery/2026-04/lHfimage.png)
- **For One Week Shift**
1. Click the employee's name to highlight the entire week. [](https://docs.goodwindcorp.com/uploads/images/gallery/2026-04/cGQimage.png)
2. Click the icon "Authorize." [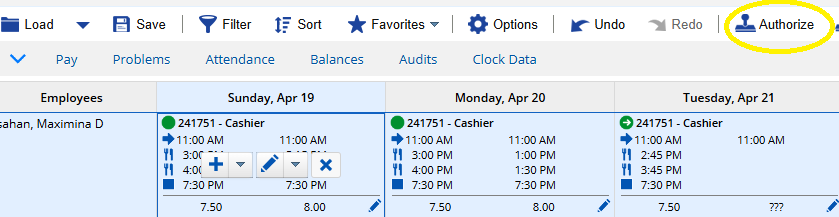](https://docs.goodwindcorp.com/uploads/images/gallery/2026-04/HsHimage.png)
3. A brown person with a check mark on top will appear on each shifts once shift has been authorized. [](https://docs.goodwindcorp.com/uploads/images/gallery/2026-04/F5Rimage.png)
# Time Off Request Entry
1. Go to Approval. [](https://docs.goodwindcorp.com/uploads/images/gallery/2026-04/E9Aimage.png)
2. On the Approval toolstrip, Click "Request New Time Off." [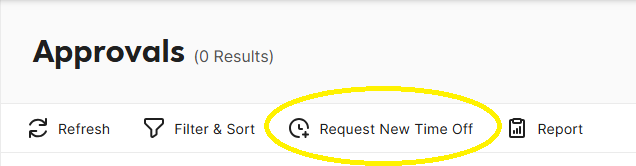](https://docs.goodwindcorp.com/uploads/images/gallery/2026-04/n8Jimage.png)
3. On the employee dropdown list, click the employee's name. [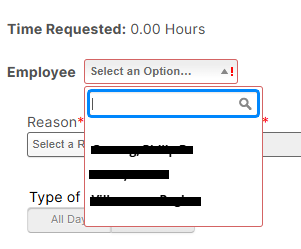](https://docs.goodwindcorp.com/uploads/images/gallery/2026-04/q8Zimage.png)
4. Select Reason on the dropdonw list, input start and end date and click Type of request. [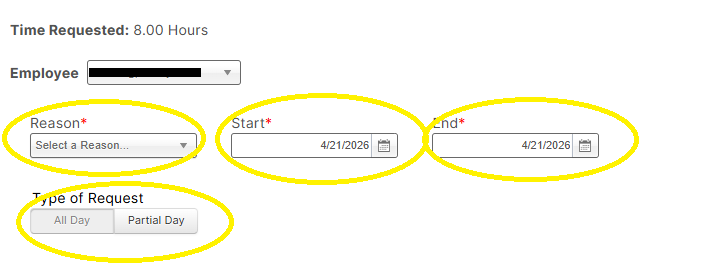](https://docs.goodwindcorp.com/uploads/images/gallery/2026-04/UYzimage.png)
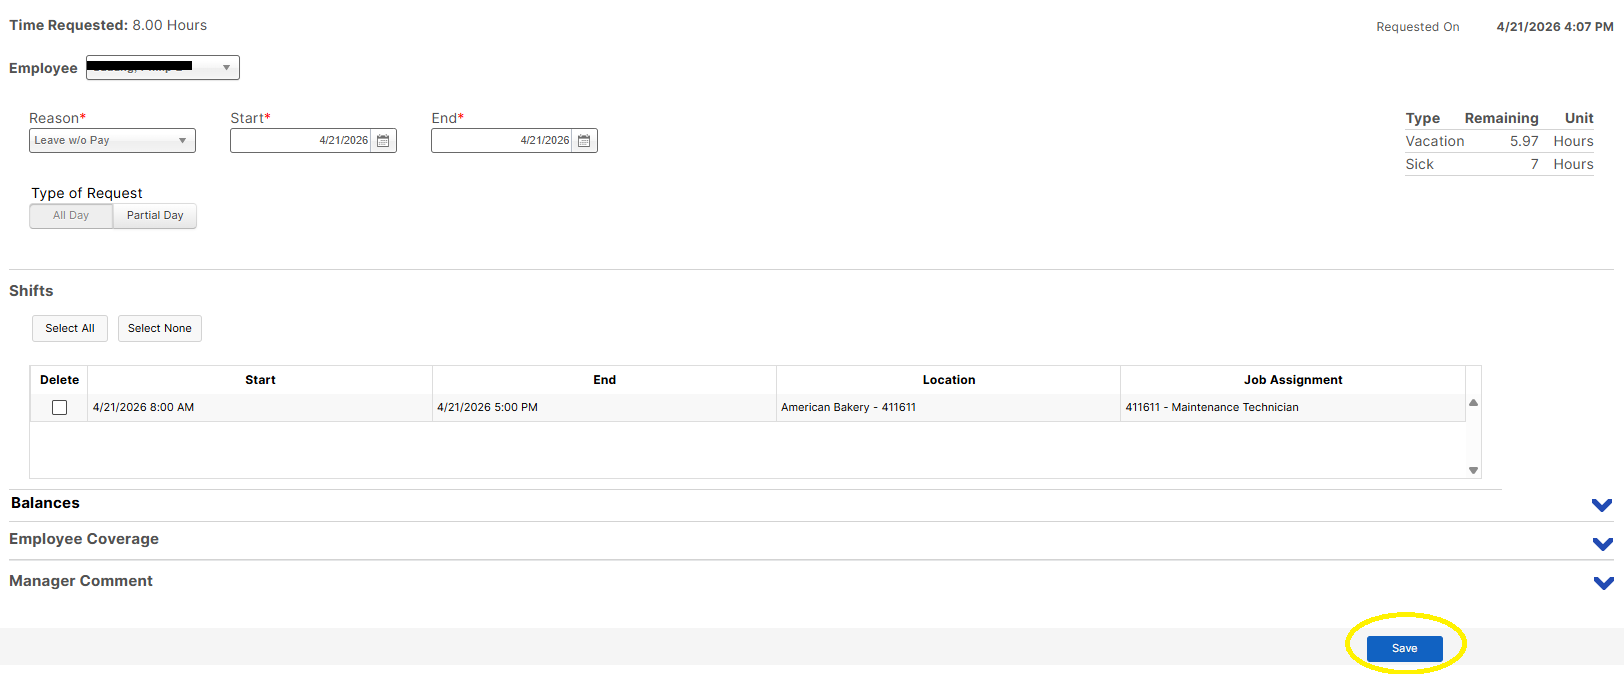
5. Click "Save."
[](https://docs.goodwindcorp.com/uploads/images/gallery/2026-04/iCXimage.png)
6. If Leave balance is not enough, an error message will appear on the screen. Employee should have sufficient leave balance in order for the transaction to go through. [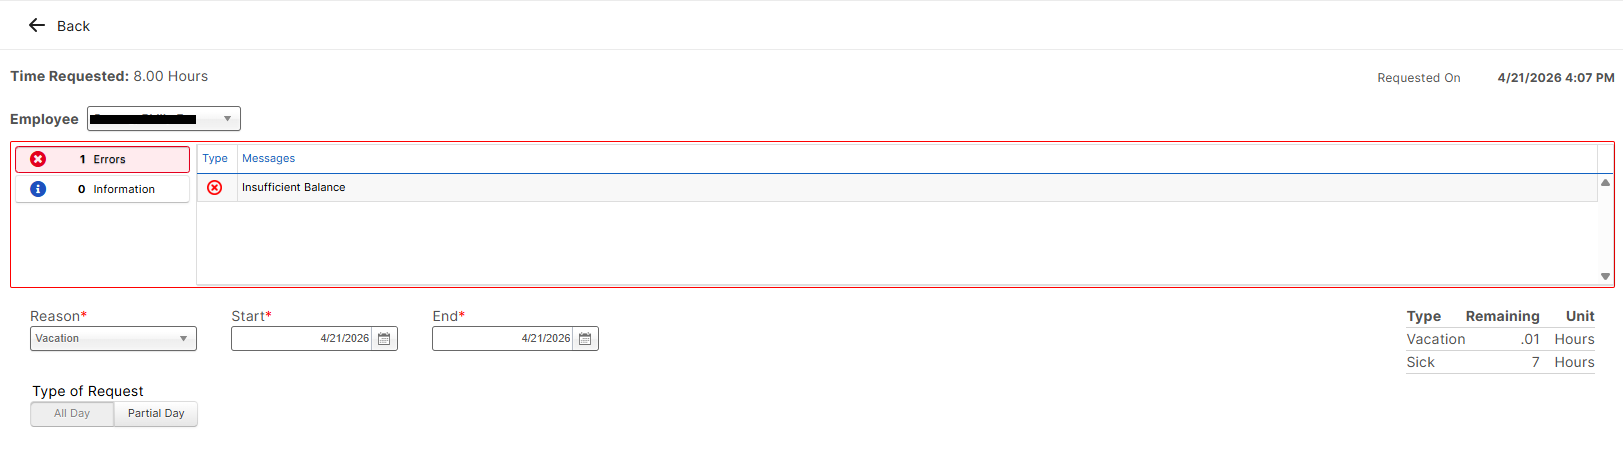](https://docs.goodwindcorp.com/uploads/images/gallery/2026-04/4F9image.png)
# Leave Approvals
#### **OPTION 1:**
1\. Click the "Approval" icon.
[](https://docs.goodwindcorp.com/uploads/images/gallery/2026-04/Bkfimage.png)
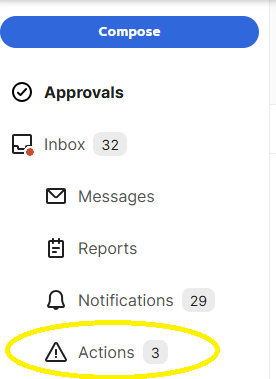
2\. Click "Action" to view pending leave approvals.
[](https://docs.goodwindcorp.com/uploads/images/gallery/2026-04/bljimage.png)
3\. Click the leave request that you want to open.
[](https://docs.goodwindcorp.com/uploads/images/gallery/2026-04/KmFimage.png)
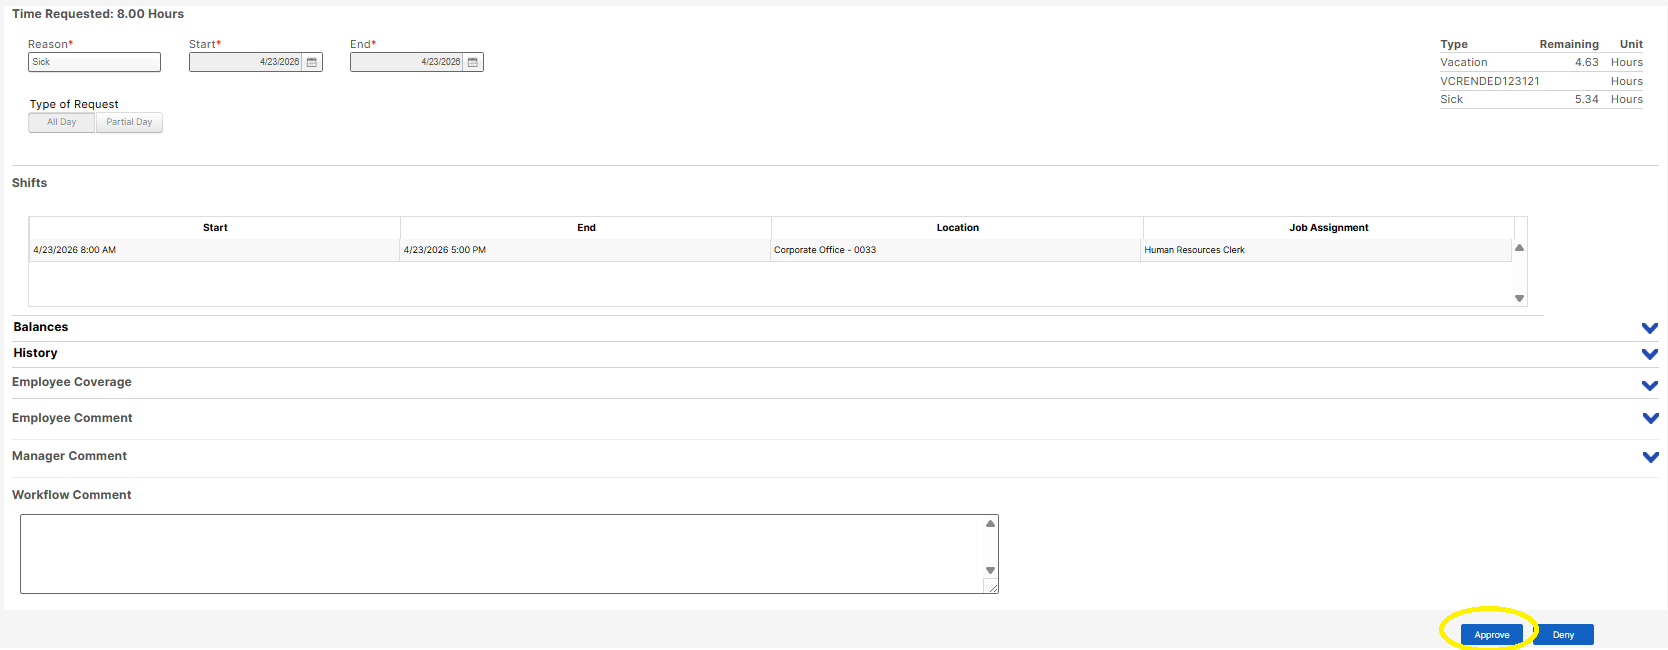
4\. Click the "Approve" icon to grant the leave request.
[](https://docs.goodwindcorp.com/uploads/images/gallery/2026-04/TXMimage.png)
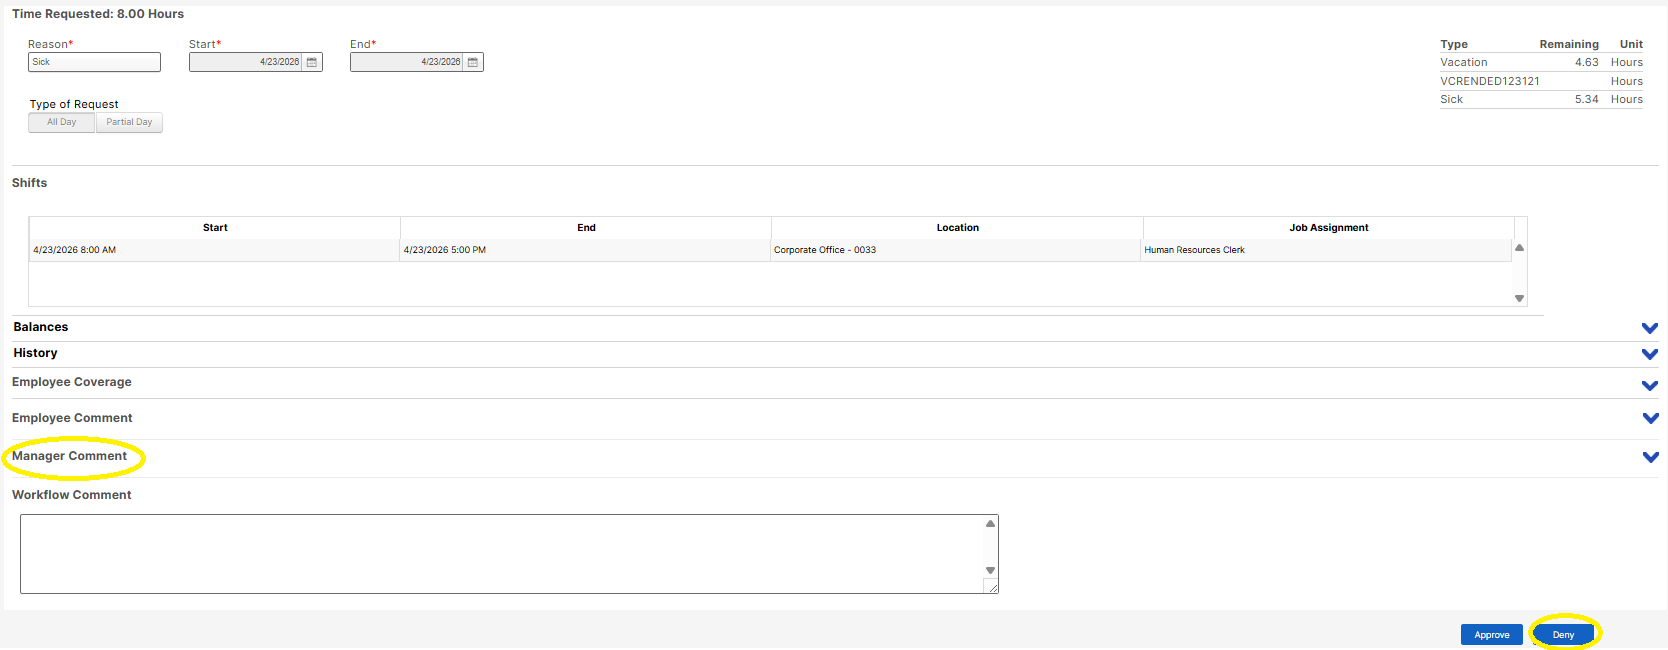
5\. If Denied , click the " Manager comment" to input reason of denying the request and then click the" Deny" icon.
[](https://docs.goodwindcorp.com/uploads/images/gallery/2026-04/9n6image.png)
#### **OPTION 2:**
1\. Click the "Approval" icon.
[](https://docs.goodwindcorp.com/uploads/images/gallery/2026-04/Bkfimage.png)
2\. Click the "Approve" icon to grant the leave request.
[](https://docs.goodwindcorp.com/uploads/images/gallery/2026-04/sULimage.png)
5\. If Denied , click the " Manager comment" to input reason of denying the request then click the" Deny" icon.
[](https://docs.goodwindcorp.com/uploads/images/gallery/2026-04/9n6image.png)